
Overview
Requirements are used to define resource needs at a high level. Without actually identifying a specific resource, Project Managers create Requirements based on specific criteria (e.g., skills that a resource should possess). After a Requirement has been created, these criteria can be searched on for matching resources prior to making a Reserve or Allocation.
Once a Requirement has been created, the Resource Manager can approve and assign the Requirement to a resource. See Fill, Substitute, and Deny a Resource Requirement for instructions on this process. After the Requirement has been reserved or allocated, the Project Manager can verify no other Requirements are pending or unfilled.
Before you begin:
- When accessing Planview, it is best to use Internet Explorer or Chrome.
- A work portfolio must be created prior to creating a requirement.
Define a Resource Requirement
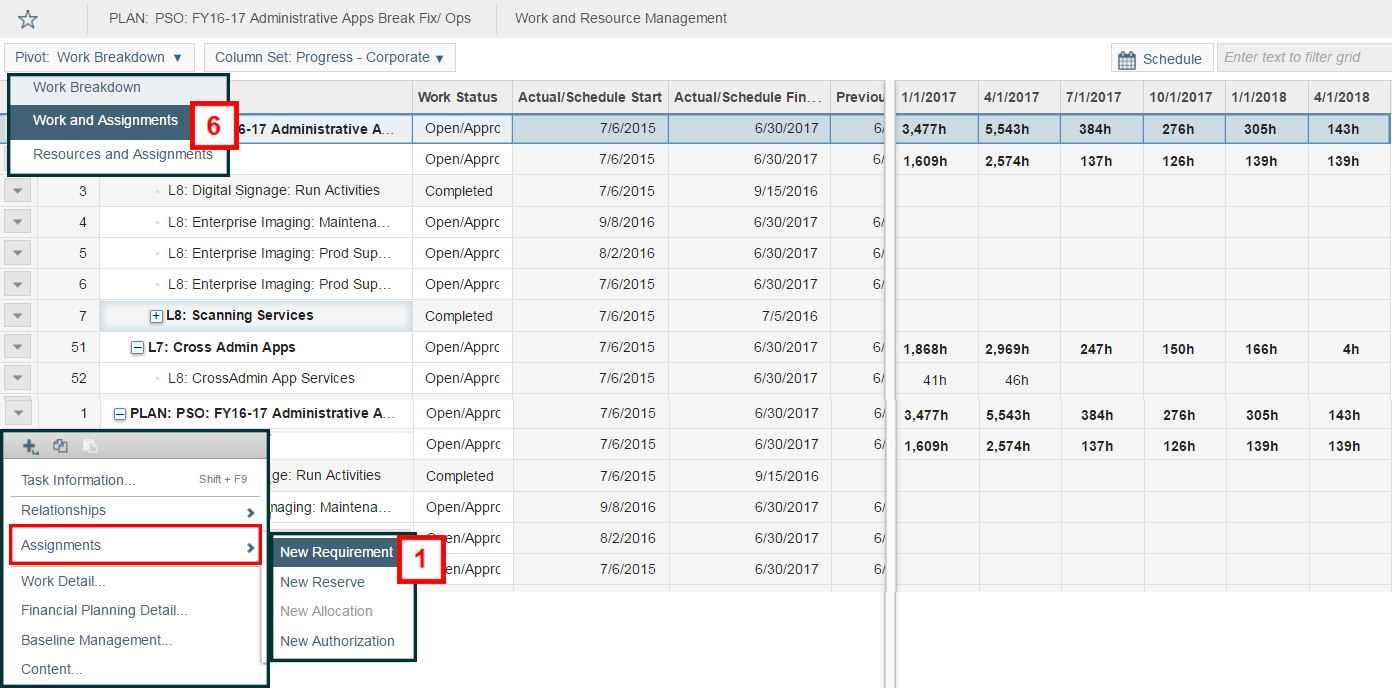
Navigation: Work - (select project) - Work and Resource Management
- Select Assignments - New Requirement from the drop-down list located to the left of the Plan row.
Note: The requirements should be created at the PLAN level.
- Locate the resource role you are requesting.
- Check the organizational resource's box under Description.
Note: This is a combination of ITS groups and resource roles.
- Click OK.
- Select Work and Assignments from the Pivot drop-down list.
- Select Task Information from the drop-down list to the left of the resource role.
- Verify or enter the Total Effort for the resource(s).
Note:
- This value defaults from the Schedule Duration listed in the WBS above.
- The value is for a Requirement and not for a resource assignment. For example, if three employees are needed at 25 hours each, you would enter 75 hours.
- If in Execution Stage, double-click the Addressed To field and select the Resource Manager to receive the request.
Note:
- If this request is being created by a Definition Project Manager during the definition stage of the Demand Management process, leave the Addressed To field blank.
- See the ITServices organizational chart for a complete list of managers or check with your manager to determine the appropriate Resource Manager.
- It is important that the requirement is addressed to the right Resource Manager. If left un-addressed, it may not be filled within a timely manner.
- Scroll to the right and click the value in the Additional Criteria field.
- Select the resource level from the Rank drop-down list.
- Click Skills.
- Check the boxes next to the required skills.
- Click OK.
- Click OK and close the Task Information window.
- Close the Task Information window.
- Select Fill Requirement from the drop-down list to the left of the resource to view the resource’s availability.
Note: In order to view this screen you must have a Resource Portfolio set up.
- Click Save.
- Click Close.
Validate a Requirement Has Been Filled
Once a Resource Manager has reserved a resource for the requirement, the Project Manager can verify the requirement was filled through the Reserve tab.
Navigation: Work - Work - (select project) - Work and Resource Management
- Select Work and Assignments from the pivot drop-down list.
- Verify that a resource name and solid icon appear under the work item.
Note: Unfilled requirements appear with a resource role and outlined head icon.
Create an Allocation From a Reserve
- In Work and Resource Management, select Task Information from the drop-down list to the left of the reserve.
- Click the Allocate tab and click New Alloction
- Locate and check the box next to the resource.
- Click OK.