
This document contains instructions for creating and managing groups in the MCommunity Directory. Note that only members of the University of Michigan community who have their own directory profiles can create and manage groups in the directory.
For details about how you become a member of (and remove yourself from) groups in the MCommunity Directory, see Managing Your Membership in MCommunity Directory Groups.
Tip Most changes you make to your MCommunity Directory profile or groups take effect immediately or within a couple of minutes. Some changes, particularly those that must get to multiple systems, may take longer. When will my MCommunity changes be made?
Table of Contents
- What is a Directory Group?
- Your Group Is in M+Google
- Responsibilities of Group Owners
- Creating a Group
- Finding all the Groups You Own or Are In
- Making Changes to a Group
- Group Info
- Members, Owners, and Moderators
- Moderated Groups
- Member Options Settings
- E-Mail Delivery Settings
- Seeing What Your Group's Profile Looks Like to Others
- Deleting Groups
- Renewing Groups
- Disabled Groups
What is a Directory Group?
A group in the MCommunity Directory is basically a list of people and/or groups. Groups are used for sending email and for authorization.
-
Email Directory groups are used primarily for sending email. Mail sent to a group created in the directory is delivered to each member of the group. Groups created in the directory can be used by anyone to send mail, regardless of what email program they use. To send email to a directory group, send it to [email protected] (where you have substituted the actual group name for groupname).
-
Authorization Directory groups are also used for authorization; some groups control access to web sites, wikis, and other online resources.
The MCommunity Directory is a public directory. You can hide the member list of your group and limit the visibility of some of the information you provide about your group. The group name will appear on the group's profile page and in search results. If you have a group that requires greater privacy, we recommend that you use a different tool.
Your Group Is in U-M Google
MCommunity groups are synchronized to
To use a group for sharing resources in Google, you must set it so that anyone can send mail to it and so that it is not moderated. Otherwise the notifications that the resource has been shared with cannot be delivered.
Responsibilities of Group Owners
-
Have a clear purpose for the group. It is helpful to state this purpose in the Description part of the group profile.
-
Respect the privacy expectations and preferences of your group members. If you make the member list of your group visible to anyone, anyone with web access can look up the group in the directory and view its member list. While this is appropriate and preferable for most groups used for university work, there are situations where it is more appropriate to make the member list viewable by members only:
-
Groups with an ethnic, gender- or sexual-identity, or religious focus. Some members of such groups may not want their membership in such groups made public, and group owners should respect this by making the member list private.
-
Groups of students in a class. To avoid violations of FERPA, a federal law that protects the privacy of personally identifiable information from student education records, member lists of students in a particular class must not be public. Consider using another tool for managing this kind of group, such as CTools.
-
Groups focused on a controversial topic or area. Your group members may not want their membership in such groups made public.
-
If group members ask you to make the member list private. Please honor requests for greater privacy from members of your group.
-
-
Include group members only with their permission. It is best to get permission from people before adding them to a group. We recommend notifying potential group members and giving them the option to not be in the group. However, owners of groups used for university business (for example, a list of staff members in a particular department) may be required by their unit to include certain people.
-
Remove group members who ask to be removed. Owners of groups used for university business, however, may be required by their unit not to remove people from those groups.
-
Provide a valid mail-forwarding address in your own MCommunity profile. This allows group members to contact you with requests and allows you to receive automated email reminders to renew your group before it expires.
-
Renew your group on a yearly basis if you wish it to remain active. Groups expire after one year unless they are renewed. You may renew your group as often as you wish.
-
Consider setting more than one owner for your group. This is particularly important if you will be away for any length of time and will need to have others maintain the group in your absence. It is strongly recommended that groups used for university business have more than one owner. You can have a group own a group.
-
Delete your group from the directory when it is no longer needed. This prevents members from receiving unwanted mail.
-
Don't leave orphaned groups. If you leave the university, either delete your group(s) or designate new owners as appropriate.
-
Set your group appropriately to meet the members' needs and reduce unwanted mail. For example, if the group is for discussion among group members only, set it to be members-only; that way, no one else will be able to send mail to the group.
-
Do not use the group for sending spam. It is a violation of university policies to create an email group with the intent of sending out what would generally be regarded as spam (unless the group owner received permission from the members of the group). Advertisements or solicitations for commercial events or endeavors are prohibited.
ITS reserves the right to immediately disable any directory group that is being used inappropriately and has generated complaints from group members.
Creating a Group
The directory takes you through a three-step process when you create your group. First you name your group, then select some initial settings, then add members and owners. You can select additional options and settings by editing your group.
-
Go to the MCommunity Directory and log in with your uniqname and UMICH password.
- On the directory's home page click Create a group.
- Enter a name. Group names:
- Must be between 9 and 60 characters long.
- Can contain any letter or number.
- Can contain spaces, single quote marks (') and dashes (-).
- Should be descriptive and easy to read.
- Cannot contain other special characters, such as dots. If you enter a group name with dots, the dots will be replaced by spaces automatically.
- Cannot end with a single quote mark, or the group creation will fail.
We recommend that you separate words in your group name with spaces. Then, when you send email to the group, you can substitute dots (.) for the spaces in the email address. Once your group has been created, you cannot change the name, so choose it with care.
- Enter an email address for your group. The group email address
- Must be between 9 and 64 characters long (excluding the @umich.edu part).
- Should be something that is quick and easy for people to type when sending mail.
- Can contain letters, numbers, dashes (-), and dots (.), but no other characters.
The @umich.edu will be added for you. The address you enter here will be reserved for your group; MCommunity makes sure the address is not already reserved for another group before saving it. Once your group has been created, you cannot change the email address, so choose it with care.
- Enter a description for your group, then click Continue.
-
You cannot change your group name once it has been created, so choose carefully. The name will be displayed in search results and on the group's profile page.
-
Enter the email address you'd like to use for sending mail to your group.
-
The description will appear on the group's profile page. You will be able to make changes to the description after you create the group.
-
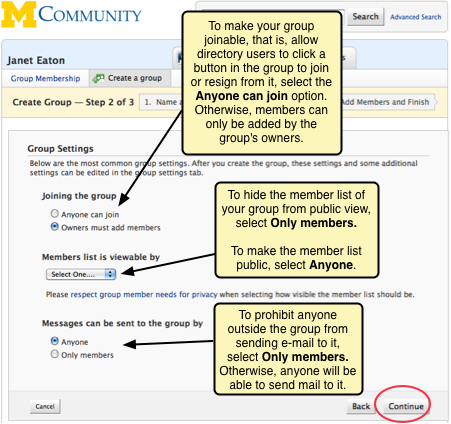
- Select your group settings, then click Continue.
Important Your group members depend on you to protect their privacy regarding membership in your group. While it is appropriate and preferable for most groups used for university business to have public member lists, there are situations where it is more appropriate to make the member list viewable by members only. Please respect the privacy expectations and preferences of your group members when selecting how visible the member list should be.
-
Add owners and members to your group. These can be people or groups. When you are done, click Finish.
-
For individuals affiliated with
U-M , enter uniqnames. -
For directory groups, be sure to enter the group's name (not its email address) exactly as it appears in its group profile. If, for example, the group name is made up of more than word with spaces inbetween, enter the spaces; adding dots between words will not work.
-
You can add external members who do not have a U-M email address. Add them by typing in their full email address.
-
It is a good idea to have several owners for your group in case one of you is away when a change needs to be made.You can have another group be the owner of your group if you wish. This allows the members of the owning group can make changes and renew the group.
-
There are two ways to add members to your group. You can enter uniqnames, group names, or, for people outside U-M, full email addresses.
-
- You will see your new group profile, along with a confirmation message that the group was created.
When you first create your group, you will see a No next to Sent to
U-M Google. It takes a few minutes or so for your group to be sent to Google. The No will change to Yes once the group information has been sent. It may take up to a day after that for Google to process the information and create your group inU-M Google. MCommunity can tell you when it has sent the information, but it cannot look inside Google to see when the group has been created there.
Finding all the Groups You Own or Are In
Finding All Your Groups
-
Log in to the MCommunity Directory.
-
Click the My Groups link that appears in the top right corner of any MCommunity Directory page when you are logged in.
-
You will see a list of all the groups that you own or are a member of.
-
Ownership is indicated by a star.
-
Membership is indicated by a little person (member) icon.
-
If you are a moderator of a group (someone who reviews mail sent to a group, deciding what to pass on to the group members and what to delete), there will be a badge icon next to that group name.
-
If you are a member of a group that owns another group, the group owned by the group that you are a member of will be listed with a blue star next to it.

-
Finding the Groups You Own
To see a list just of the groups you own, use MCommunity's Advanced Search page.
-
At the top of any page, click Advanced Search.
-
Near the bottom of the Advanced Search page, next to Owner matches exactly, type your uniqname. Then click Search Groups.
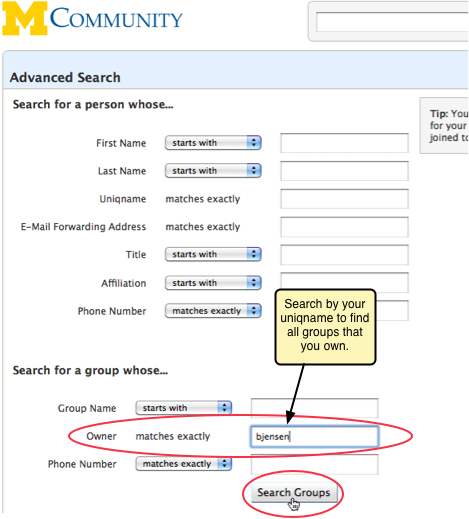
Note Only groups that you own directly as an individual will display using this search. Groups that you own as a member of an owning group will not display, although they will be listed under My Groups with a blue star.
Making Changes to a Group
Note Only the owner of a group can make changes to that group. You must be logged in to make changes.
-
Go to the MCommunity Directory and log in with your uniqname and UMICH password.
-
Find the group you want to modify and view its profile. You can use the Search box to find the group, or click the My Groups link to see a list of your groups then click the one you want.
-
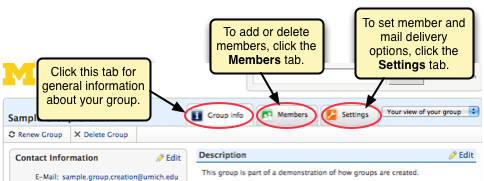
In the group profile, click the Group info tab to change general information about your group, click the Members tab to change members, owners, and moderators, and click the Settings tab to change settings that control how your group works.
Group info
Click the Edit link in the section you want to edit to make changes to general information about your group.
"Viewable by" Menus
For several of the items under the Group info tab, you will see a Viewable by menu. For these items, you can choose who can see the information.
-
Everyone. Anyone with web access can see the information.
-
U-M Only. Only members of the U-M community can see it. That is, anyone who can log in to the directory with a uniqname and UMICH password, and they must be logged in to see the information. This includes faculty, staff, students, retirees, alumni, and sponsored affiliates.
-
Members Only. Only the members of the group can see the information, and they must be logged in to see it.
Contact Information
You can provide additional contact information for your group, such as a phone number, fax number, and address; you can also choose who can see it (everyone, U-M only, or group members only).
Description
Change the Description for your group and choose who can see it. The Description appears in search results as well as on the group's profile page.
Also Known As
You can add names for your group that can be used to help people find your group when searching the directory.
Also Known As names can be used when sending email to your group, and are treated as reserved group names. This means that other groups cannot be created with the same name as an Also Known As name assigned to your group. An Also Known As name must be more than nine characters long to avoid conflicts with uniqnames.
-
Click the Add Alias link.
-
Enter your group's Also Known As name or Alias, then click Save.
Notice
Enter text for your group notice, select members who will be granted viewing rights from the Viewable by menu, then click Save.
Links
If your group has a website or page, you can include a link to it in your group profile. Provide a name for the page you are linking to, enter the URL, select who you want to be able to see it, then click Save.
See Also
You can add group names and uniqnames that are related to your group. People will be able to click these to go to the group or person profiles.
-
Click the Add See Also link.
-
Enter a uniqname or group name, select who you want to be able to see it, then click Save. Click the Add See Also link to add more.
Members, Owners, and Moderators
Viewing Members, Owners, and Moderators
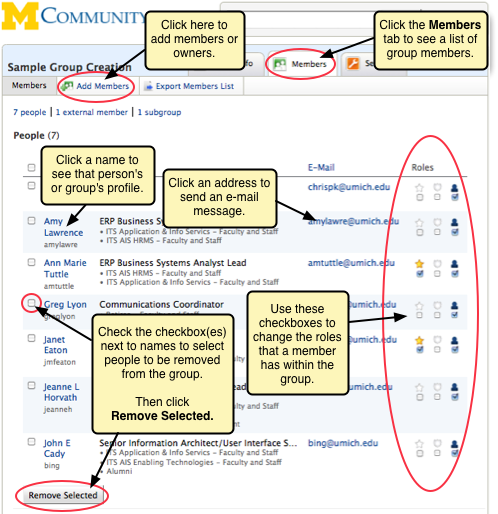
Click the Members tab to see a list of all group members, including people with MCommunity profiles, people outside the university (listed by their full email address), and other MCommunity groups (listed as subgroups).
If your group has less than 300 members, member names and affiliations will be displayed. If it has 300 or more members, only uniqnames will be displayed.
Members can have one or more roles:
-
Member. Indicated by a checkmark under the person icon. This means the person is a member of the group. You must be a member of a group to receive email sent to it.
-
Owner. Indicated by a checkmark under the star icon. Group owners can edit, renew, and delete the group. If you own groups used for departmental or other university work, please add new owners if your role changes or you leave the university. Note that group owners must also be members in order to receive email sent to the group.
-
Moderator. Indicated by a checkmark under the badge icon. Moderators screen email for a group. If a group has one or more moderators, mail sent to the group goes to the moderators only. It is then up to the moderators to send mail on to the group members or not.
Important Moderation interacts with the email delivery setting of who can send mail to the group:
-
Moderated + Anyone can send mail to group = All messages go through moderator.
-
Moderated + Only members can send mail to group = Messages from non-members go through moderator; messages from members go directly to group.
-
Tip Group owners can download a copy of the member list as an Excel spreadsheet as an aid to group management.
Tip If you need to set your group so that only the group members can see the membership list, click the Settings tab to see that option.
Adding Members, Owners, and Moderators
-
Under the Members tab, click the Add Members button.
-
Enter owners, members, and moderators in the appropriate boxes.
A group can be an owner and/or a member of a group. It is then listed as a subgroup on the My Groups page, with the appropriate icons checked to designate ownership or membership. If you add a group, be sure to enter the group's name (not its email address) exactly as it appears in its group profile. If, for example, the group name is made up of more than one word with spaces between them, enter the spaces; adding dots between words will not work.
-
Owners can be entered as uniqnames or groupnames.
-
Members can be entered as uniqnames, email addresses, or group names.
-
Moderators must be entered as email addresses.
Important Moderation interacts with the email delivery setting of who can send mail to the group:
-
Moderated + Anyone can send mail to group = All messages go through moderator.
-
Moderated + Only members can send mail to group = Messages from non-members go through moderator; messages from members go directly to group.
-
-
You'll see confirmation that the membership of the group was updated.
Deleting Members, Owners, and Moderators
-
To delete someone from a group, select them by clicking the checkbox next to their name. Then click the Remove Selected button.
-
To change someone's role(s) within a group, check or uncheck the checkboxes to the right of the person's name.

Searching All Your Groups for a Person
Have you ever needed to remove someone from a whole lot of MCommunity groups at once when they changed roles or left the university? You can use the search box on your My Groups page to search all your groups for a particular person.
-
In the search box on your My Groups page, type the uniqname of the person you want to search for in all the groups you own. This searches groups that you own directly, with your uniqname listed as an owner, as well as indirectly, as a member of an owning group.
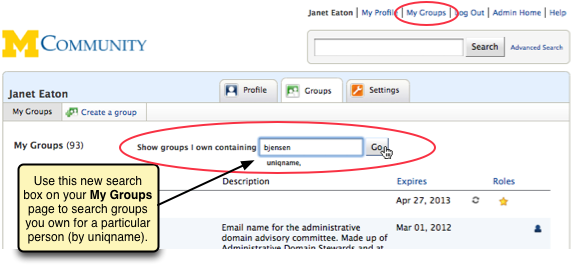
-
You'll see a list of the groups you own that the person is in. You will have the option to select multiple groups and remove the person from all those groups at once.
-
Select the groups you want the person removed from by checking the appropriate checkboxes, then click the Remove button.
When Groups Own Groups
One group (an owning group) can own another group (an owned group). When this happens, the members of the owning group have ownership privileges for the owned group, but they do not have member privileges for that group.
-
Ownership privileges. Members of an owning group can edit, renew, and delete the owned group. On the My Groups page for each member, ownership of a group is indicated by a blue star (to indicate that they own the group as a member of an owning group) instead of a yellow star (to indicate they own the group as an individual). Some functions, such as the option to delete the group, are available only from the owned group’s profile page.
-
Members of the owning group have ownership privileges for the owned group. That is, they can add members, renew it, and more. However, if another group is a member of the owning group, the members of that member group will not have these privileges.
-
Owners of the owning group have ownership privileges for the owning group, but not for the owned group. That is, they can add members and so on for the owning group, but not for the group that it owns.
-
-
Membership privileges.
-
Members of the owning group have membership privileges only for the owning group. While they have ownership privileges for the owned group, they do not have membership privileges for the owned group. For instance:
-
Members of an owning group cannot send mail to an owned group if it is set to receive mail from members only.
-
Members of an owning group will not receive mail sent to the owned group.
If members of the owning group would like membership privileges for the owned group, they would need to become members of the owned group.
-
-
Members of the owned group have membership privileges for the owned group and not the owning group. The owned group is owned by the owning group, and is not a member of the owning group. For instance:
-
Members of the owned group cannot see the members of the owning group if the owning group's membership visibility is restricted to members only.
-
They cannot send mail to the owning group if sending mail is restricted to members only.
-
-
-
Determining Group Relationships. On a group’s profile page, owning and member groups are listed under the Subgroup header. A star or a person icon will be checked to indicate whether the group listed as a subgroup is an owner or a member of the group.
Downloading the Member List
Group owners can download a copy of the member list of their group that can be opened in Excel or another spreadsheet program. The downloaded file contains email addresses, uniqnames, names, member type (person, external member, or subgroup), and whether the person is a member, owner, or moderator.
-
You must be logged in and an owner of the group to download the member list.
-
In the group's profile, click the Members tab.
-
Click the Export Members List button.
-
Depending on the web browser you use, the file may open in Excel, the file may be downloaded, or you may be asked to choose what to do with the file.
If the file is downloaded but not opened, you can open it from Excel.
-
In Excel, from the File menu, choose Open.
-
From the Enable pop-up list, select All Files. Then select the downloaded file and open it.
-
Moderated Groups
To make a group moderated, designate one or more moderators. There are two ways you can do this:
-
On the Group Members page, click the Moderator checkbox next to a person's name to make that person a moderator.

-
If the person is not already a member of the group, add them on the Add Members page. See Adding Members, Owners, and Moderators above. In most cases, you should add them as both a member and a moderator. That way they will be able to verify that group members have received the messages they send on.
In a moderated group, messages sent to the group are received by the moderator, a person who takes responsibility for screening the messages. The moderator decides whether the message is appropriate and, if it is, forwards it on to the group.
Warning The moderator will not receive notification that messages are not going to the group. The moderator must remember that any mail he or she receives that is addressed to the group from someone other than a moderator has only been delivered to the moderator. This means that the moderator must be careful to review the To and From line of all received messages. The group will not receive any messages that are sent to the group unless the moderator sends them on.
Important Moderation interacts with the email delivery setting of who can send mail to the group:
-
Moderated + Anyone can send mail to group = All messages go through moderator.
-
Moderated + Only members can send mail to group = Messages from non-members go through moderator; messages from members go directly to group.
The group owner can serve as moderator or can designate one or more moderators. Be sure to get a group member's permission before designating him or her as moderator. If the group has more than one moderator, each of them will receive copies of the messages that are addressed to the group. The moderators will have to agree on how they will handle the incoming messages and who will be responsible for forwarding them to the rest of the group.
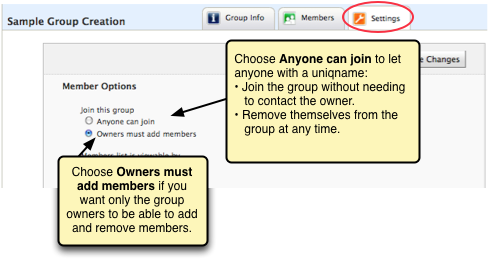
Member Options Settings
Letting Members Join & Resign
You can choose whether to allow people to add or remove themselves from the group or to let only the owners change the membership. Whenever possible, given the purpose of your group, allow people to choose for themselves whether to be in the group or not.
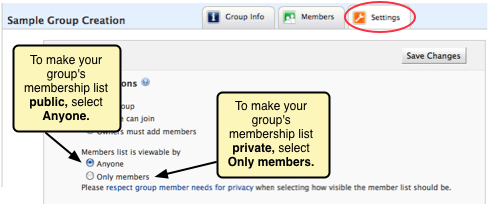
Member Visibility (Privacy)
Group owners can make the member lists of their groups either visible to the public or hidden from all but group members who are logged in to the directory and
-
Public groups have member lists that are visible to all If someone looks at the group's profile and views its member list, they will see the members listed there. If a member of the university community invites a public group to a
U-M Google Calendar event, he/she will see the members listed. -
Private groups have member lists that are visible to members only Group members who are logged in can view the member list in MCommunity or in
U-M Google Calendar events to which the group has been invited. No one else can see it.
Warning If you make a private group joinable (see above) group membership will be visible to anyone who is logged in to the directory.
It is appropriate and preferable for most groups, particularly those used for university business, to be public. However, there are situations where it is more appropriate to make the member list viewable by members only.
Important Please respect the privacy expectations and preferences of your group members when selecting how visible the member list should be.
Email Delivery Settings
Who Can Send Mail to the Group
You can choose whether anyone can send mail to your group or only the members can. If you set your group such that only the members can send mail to it, non-members who try to send mail to the group will get an error message letting them know their mail was not delivered.
ImportantThe email delivery setting of who can send mail to the group interacts with group moderation (that is, if you have set moderators for your group):
-
Moderated + Anyone can send mail to group = All messages go through moderator.
-
Moderated + Only members can send mail to group = Messages from non-members go through moderator; messages from members go directly to group.
Where Errors and Requests Go
You can choose who will receive error messages concerning mail sent to the group, i.e., notices that mail could not be delivered to a particular group member.
You can also choose where mail sent to [email protected] (where "groupname" has been replaced by your own group's name) goes. This address appears as a contact address on your group's profile page.
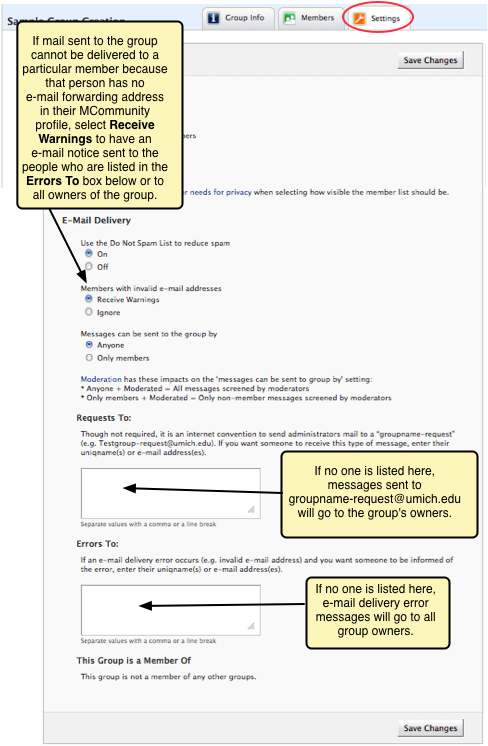
The Do Not Spam List
When this is turned On, mail sent to your group from known spammers is rejected. See Using the Do Not Spam List to Reduce Spam for details. It is recommended that you leave this turned on.
Seeing What Your Group's Profile Looks Like to Others
Your view of a group that you own includes information that others cannot see. To see what your group looks like to the general public (that is, to people who are not logged in to the directory), select Public view from the menu near the top right corner of the page. Note that this option is only available on the Groups Info tab.

Deleting Groups
Important Only the owner of a group can delete it. If a group has multiple owners, please check with the other owners before deleting it.
To Delete a Single Group
-
View the group's profile, and click the Group info tab. Then click the Delete Group button.
-
In the confirmation dialog box asking if you are sure you want to delete the group, click OK.
To Delete Multiple Groups
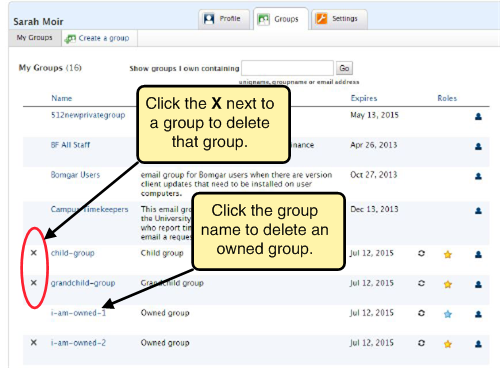
You cannot delete multiple groups at once, but, depending on how you own the group's you may be able to delete them fairly quickly using the My Groups page. (To get to that page, click the My Groups link at the top of any page. You must be logged in to see this option.) A yellow star in the Roles column for a group indicates that you are an owner of that group. A blue star indicates that you own the group as member of an owning group; that is, the group is owned by a group of which you are a member.
-
Groups you own. On the My Groups page, click the X to the left of a group name to delete that group.
-
Groups owned by groups. You cannot delete groups owned by a group of which you are a member from the My Groups page. You must go to the gropus profile page, then click the Delete Group button there.
Renewing Groups
Important You must be an owner of a group to renew it.
To Renew a Single Group
-
View the group's profile, and click the Group info tab. Then click the Renew Group button.

-
You'll see confirmation that the group was renewed, along with the new expiry date one year from today.
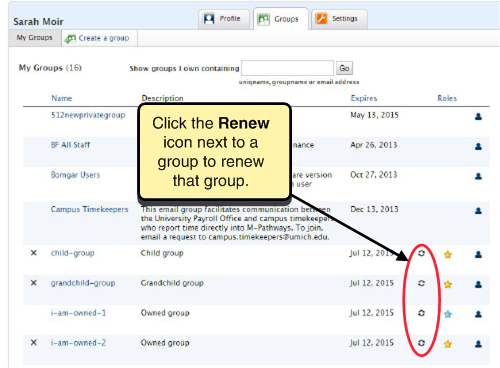
To Renew Multiple Groups
You cannot renew multiple groups at once, but you can renew them fairly quickly by looking at the list of all your groups. Click the Renew icon (two arrows going in a circle) to the right of a group name to renew a group.
Disabled Groups
Directory groups expire after one year unless they are renewed. When a group expires, it becomes disabled. At that point, all group functions stop working except the ability to find the group when searching the directory. Mail sent to the group will be returned to the sender as undeliverable; the error message will say that the group does not exist. If the group is used for authorization (for example, to allow access to a restricted web page), the authorization will fail.
The group owner(s) and the ITS Service Center can renew expired groups that are disabled.
You renew a disabled group the same way you renew any group that you own—by clicking a Renew Group button.
Note Directory groups are sometimes disabled in response to complaints from group members when use of the group violates University policy. Owners are not able to renew groups that are disabled for policy violation.