If you need to sponsor more than one person (with temporary passwords) for the same reason, you can import the data about these individuals from a file to the Sponsor System instead of sponsoring each person separately. This document explains how.
Sponsoring Multiple People by Importing a File
In most cases, university departments or units use the MCommunity Sponsor System to acquire uniqnames for individuals one-at-at-time. There are times, however, when it is more convenient to sponsor a group of people all at once with the same sponsorship information.
For example, a department might want to sponsor a group of conference attendees, all of whom need their sponsorship to begin on the same day and end on the same day.
Important The file import method can only be used for sponsorships that result in temporary uniqnames. This includes conference/program participants and other short-term guests.
Departments can sponsor multiple individuals in two ways:
-
Use the Sponsor System to import the file and set up the sponsorship by following the instructions below. To use the Sponsor System, you must be a sponsorship administrator.
-
Ask the ITS Service Center to do the sponsoring by submitting the MCommunity Multiple Sponsorship Application. The application has instructions for preparing a file listing the people to be sponsored.
Preparing a File to Import
You will need identity data for the people you want to sponsor in a Comma Delimited/Comma Separated Values (.csv) file. You can create such a file using Microsoft Excel. A template is available for you to download.
Important The maximum number of identities you can upload at a time is approximately 500. The ITS Service Center recommends that you upload no more than about 100 identities per file. Service Center staff members have found that this is optimal for speed of uploading and for ease of copying and pasting the resulting uniqnames and passwords into a spreadsheet.
Tip Do not include people who are already members of the U-M community in your file. People who already have uniqnames do not need to be sponsored; they already have access to U-M computing resources.
-
Download this Excel template and open it.
Important Do not change the column headings. The Sponsor System looks for these specific data attribute names.

-
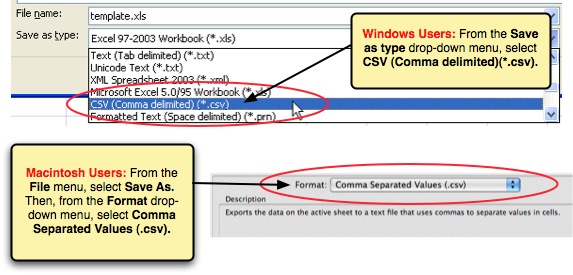
Save the file in Comma Delimited/Comma Separated Values (.csv) format. We recommend that you save the file to your computer desktop so that it is easy to find when you upload it to the Sponsor System.
-
The file is ready to be imported/uploaded into the MCommunity Sponsor System.
Importing the File
TipFor best results, we recommend that you use the Firefox web browser.
Important You must connect from a U-M network. If you need to connect from a non-U-M network, you can use a U-M Virtual Private Network (VPN) connection.
-
Log in to the Sponsor System at https://mcommunity-sponsor.its.umich.edu/sponsor/.
-
Click on the Create tab on the blue navigation bar along the top of the window.

-
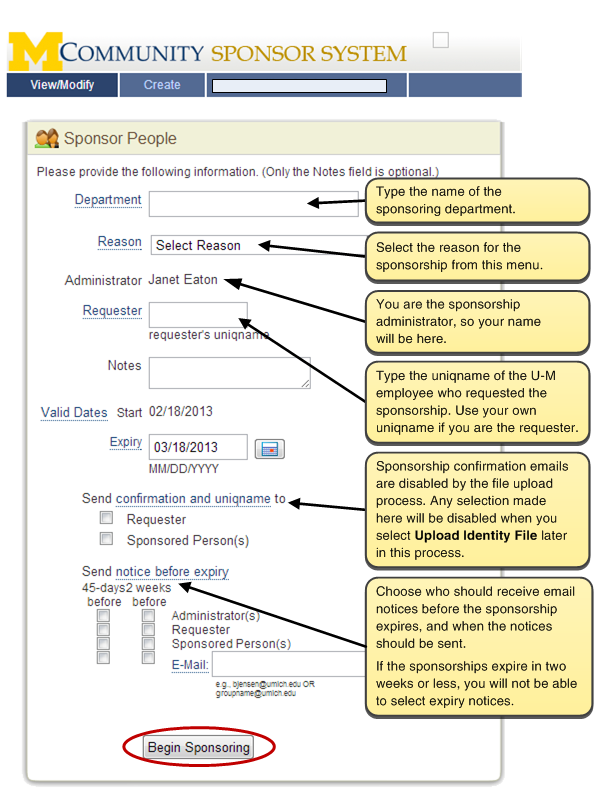
In the Sponsor People box, enter the general information about the sponsorship. Then click the Begin Sponsoring button.
Important Pay special attention to the expiry date. The sponsorship will expire on the expiry date, and the sponsored person will be unable to log in to U-M systems. (See Sponsorship Expiry in MCommunity Sponsor System Overview for details.)
-
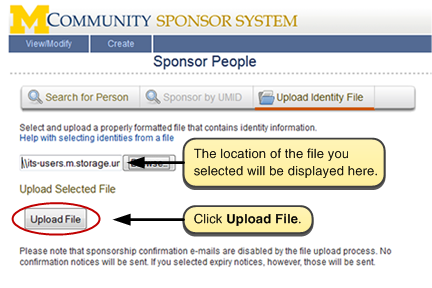
On the Sponsor People page, click Upload Identity File.

-
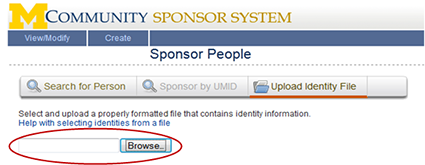
Click the Browse button. Note that some web browsers may display a different button name. Safari users, for example, will see Choose File instead of Browse.
Important Sponsorship confirmation emails are turned off by the file upload process. No confirmation emails will be sent. If you selected expiry notice emails, however, those will be sent.
-
You'll be prompted to navigate among the files on your computer. Select the appropriate file. Then click Upload File.
-
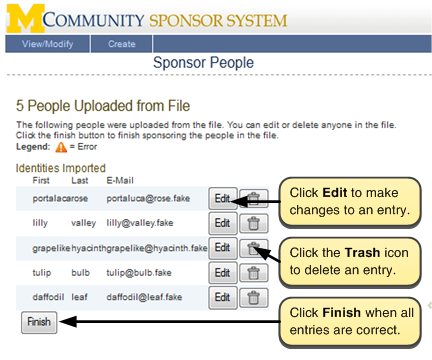
If the upload is successful, you will see a list of the people uploaded from the file. Click Finish.
If there are problems with any of the data you provided, such as missing information, you'll be prompted to resolve those issues before finishing. See Troubleshooting Import Problems below for details.
-
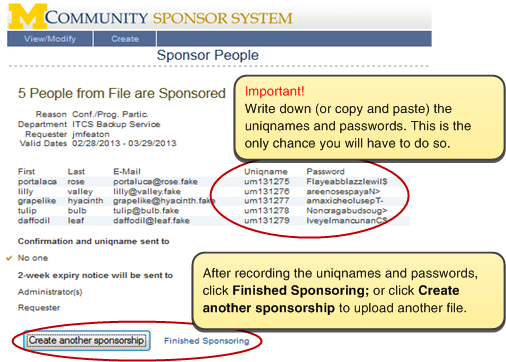
You will see confirmation that the people whose information you uploaded have been entered into the Sponsor System as sponsored individuals.
Important Copy this information and paste it into an Excel spreadsheet. This is the only chance you will have to record the information. After you have copied and pasted the information, click Finished Sponsoring. Or you can click Continue Sponsoring to sponsor additional people with the same sponsorship details.
-
It is your responsibility to convey the passwords to the sponsored individuals in a secure manner. We recommend that you convey passwords either by phone or in person. We also recommend that you tell each person to change their password to something easier to remember that only they know and direct them to the Change UMICH Password Page.
Tip You can reset passwords for sponsored people with temporary uniqnames using the Sponsor System. See Resetting Passwords Using the Sponsor System.
Troubleshooting Import Problems
If you see an Invalid File Format error message, these are some of the likely causes:
You uploaded a file that is not in .csv format. For example, if you upload a .docx or a .xlsx file, you will see the Invalid File Format error.
You inadvertently typed something outside the columns in the file for data entry. Check your file to make sure that nothing was typed outside the labeled columns.
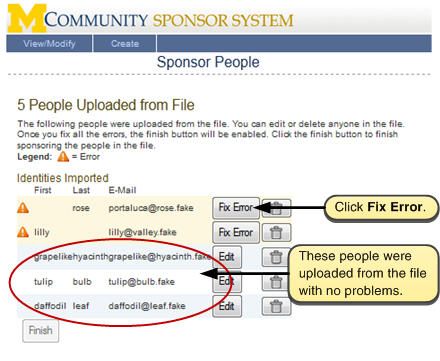
If there are problems with the data in the file you uploaded, the Sponsor System will list them for you and prompt you to fix the errors.
-
If there are problems, you will see a list of errors to fix immediately after you import the file. Click the first Fix Error button in the list to begin fixing the errors.
-
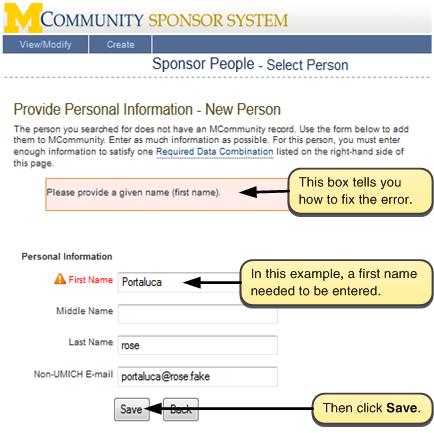
You will be prompted to enter missing information or correct invalid data. Do so, then click Save.
-
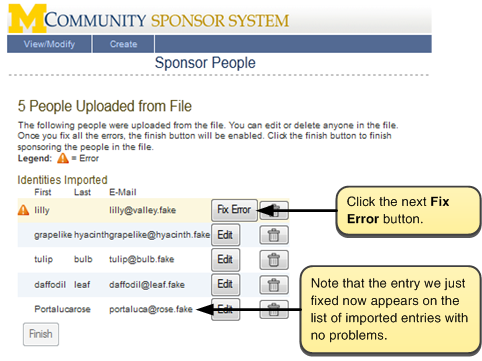
The entry just corrected is now listed with the other entries that were imported without problems. Click the next Fix Error button to continue fixing data problems.
-
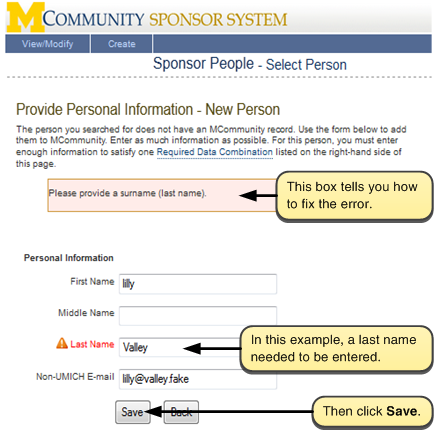
You will be prompted to enter missing information or correct invalid data. Do so, then click Save.
-
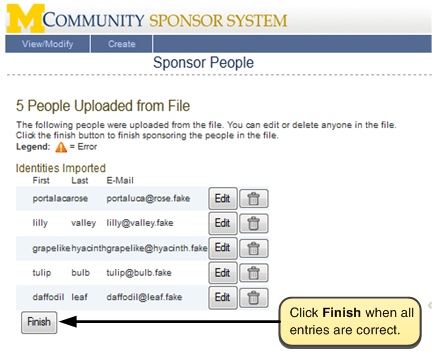
When all of the errors have been fixed, click Finish.
-
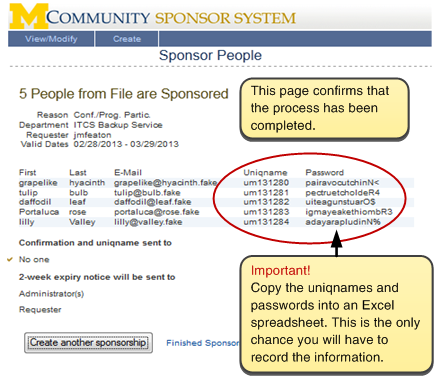
You will see confirmation that the people whose information you uploaded have been entered into the Sponsor System as sponsored individuals.
Important Copy this information and paste it into an Excel spreadsheet. This is the only chance you will have to record the information. After you have copied and pasted the information, click Finished Sponsoring. Or you can click Continue Sponsoring to sponsor additional people with the same sponsorship details.
-
It is your responsibility to convey the passwords to the sponsored individuals in a secure manner. We recommend that you convey passwords either by phone or in person. We also recommend that you tell each person to change the password to something easier to remember that only he or she knows and direct him/her to the Password Change Page.
Searching for a Group of Sponsored People and Editing the Expiry Date
You can change the expiry date of a sponsorship that applies to a group of people. For example, you might want to extend the expiry date of the sponsorship for a group of conference attendees.
-
If you are not already on the View and Modify Sponsorships page, click the View/Modify tab to get there.
-
Find the group of sponsorships by either selecting them from the list or using Advanced Search.
Selecting from the list.
Click column headers to sort the list so you can find the sponsorship(s) you want to update. For example, sort by requester, start date, or expiry date.
Then select the sponsorship(s) you want to update by checking the box(es) in the left column.

Use Advanced Search.
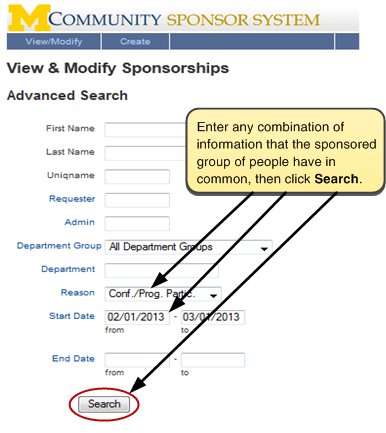
Click the Advanced Search link.

Enter any combination of information that the sponsored group of people have in common, then click Search.
-
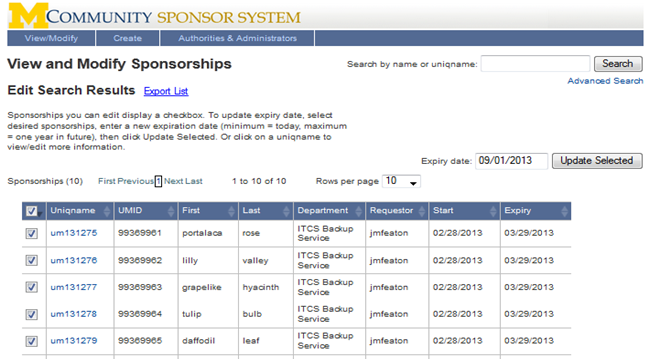
Then, on the Edit Search Results page, check the checkboxes by the sponsorships you want to update.
-
Enter the new Expiry date and click Update Selected.
-
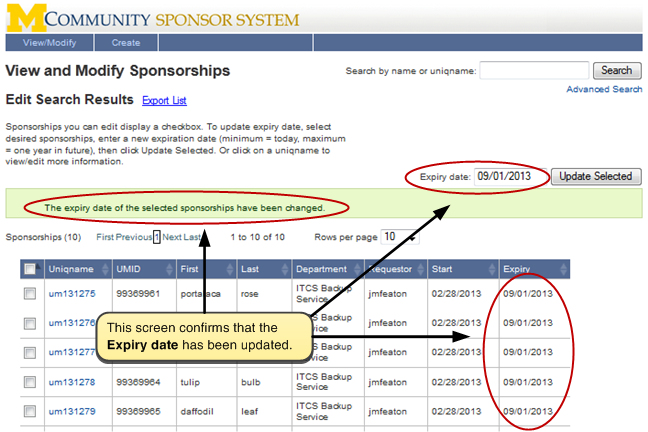
The next screen will confirm that the Expiry date has been updated.
Editing Expiry Notification Settings
Tip The expiry notifications are automatically updated when the expiry date is changed. They are relative, so notifications are sent a specified number of days prior to the expiry date.
-
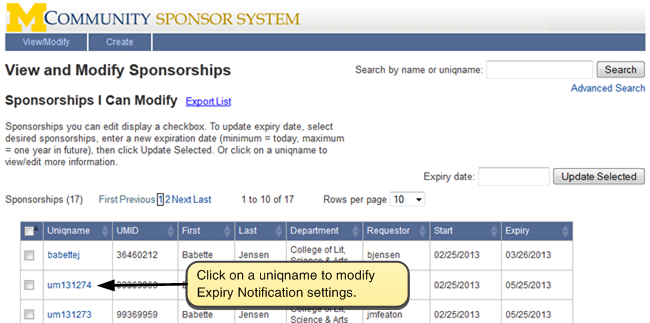
To modify Expiry Notification settings (such as when the expiry notice is sent, and to whom), click the uniqname.
-
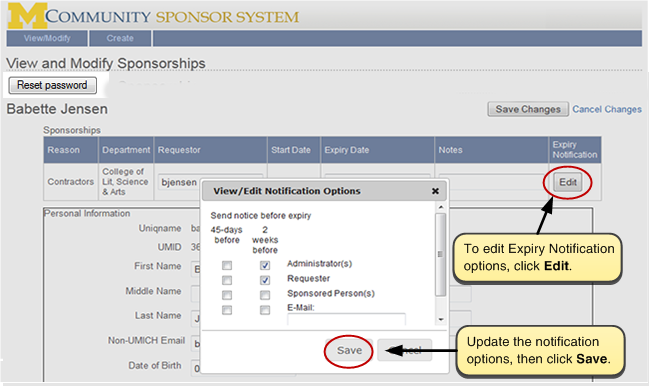
To edit Expiry Notification options, click Edit.
Update the notification options, then click Save.
Tip You can edit other information about the sponsorship from this page before saving changes.
-
Important Click Save Changes when finished.
