This document explains how to use the MCommunity Sponsor System via the web. It provides sponsorship administrators with general instructions for creation and management of online identities, including uniqnames and UMIDs, for sponsored individuals. For an overview of the Sponsor System, see MCommunity Sponsor System Overview.
About the Sponsor System
The MCommunity Sponsor System allows authorized U-M staff members to create online identities, including uniqnames and UMIDs, for people who are affiliated with the university but who do not appear in any of the official university data feeds. Sponsored individuals include, for example, conference attendees, contractors, incoming faculty who need access to U-M resources before the hiring process is complete, conference participants, and others.
For more details about the concepts behind, and terminology for, sponsorship, see MCommunity Sponsor System Overview . This document includes information about uniqname types, identity types, sponsorship lengths, minimum data requirements, notifications sent by the system, what happens when a sponsorship expires, password reset circumstances, and more.
To use the Sponsor System, you must be an authorized sponsorship administrator. To learn how to become a sponsorship administrator, see MCommunity Sponsorship Administration Policies and Agreement.
Departments can also request sponsorships from the ITS Service Center by using the MCommunity Sponsorship Application forms.
Connecting to the Sponsor System
To use the Sponsor System, you must:
-
Be an authorized sponsorship administrator. To find out if your department has a sponsorship administrator and who it is, contact the ITS Service Center.
-
Have a uniqname and UMICH password.
-
Have set up two-factor authentication. (You will need to use two-factor authentication when you login.)
-
Sign into a U-M network. If you need to connect from a non-U-M network, you can use a U-M Virtual Private Network (VPN) connection.
The MCommunity Sponsor System can be accessed at:
Tip For best results, we recommend that you use the Firefox web browser.
Sponsoring an Individual
To create an online identity and acquire a uniqname for someone, your university department must sponsor that person.
-
Login to the Sponsor System. You will see a View and Modify Sponsorships screen.
-
Click on the Create tab on the blue navigation bar along the top of the screen.
-
In the Sponsor People box, fill in the appropriate information, then click the Begin Sponsoring button.
Important Pay special attention to the expiry date. The sponsorship will expire on the expiry date, and the sponsored person will lose access to computing services and be unable to log in to U-M systems. (See Sponsorship Expiry in MCommunity Sponsor System Overview for details.)

Important If you need a UMID for the individual you are sponsoring, or if he/she already has one, select one of the sponsorship reasons associated with a regular uniqname plus UMID. Then the Sponsor System will either create a UMID for you or pull the existing UMID and associated information from Wolverine Access. Sponsorship reasons are grouped to help you find the best one for your needs.
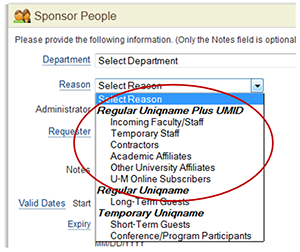
Tip For details about the sponsorship reasons, see Sponsorship Business Reasons in MCommunity Sponsor System Overview.
-
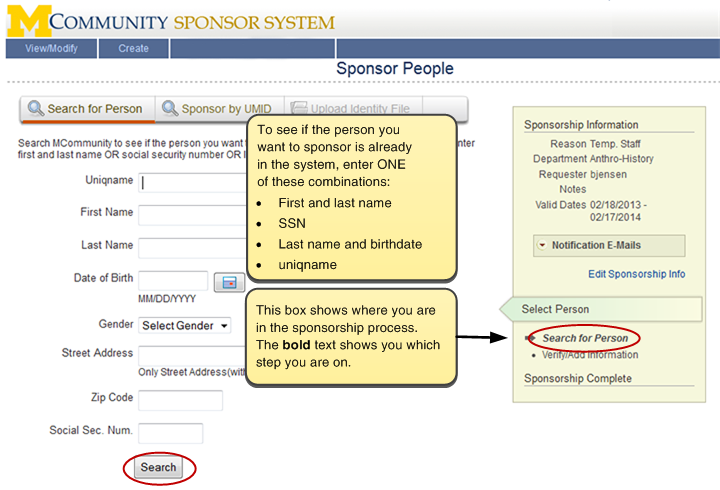
You will be prompted to search MCommunity to see if the person you want to sponsor is already in the system. This step is critical in preventing duplicate entries. See Appendix A. Tips for Searching the System to Prevent Duplicates at the end of this document for tips on effective searching. Enter information for your search, then click the Search button at the bottom of the window.
The search screen you see will depend on the sponsorship reason you selected and whether the person already has a UMID.
If the individual already has a UMID:
Click the Sponsor by UMID tab. You will then be able to enter the person's UMID and click Search.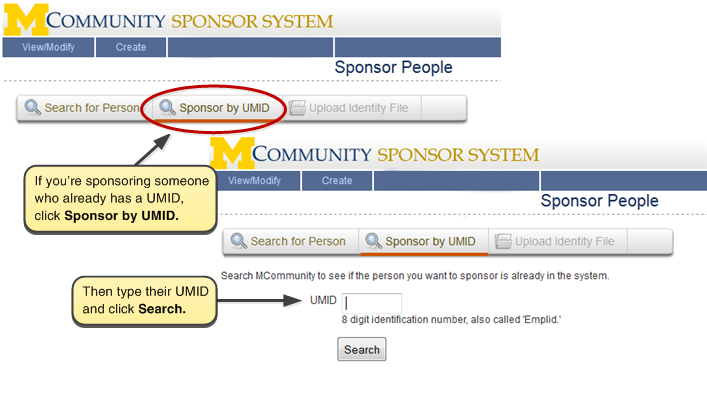
If you are setting up a sponsorship with a regular uniqname, you can search by entering a variety of information.
If you are setting up a sponsorship with a temporary uniqname, you can only search by the first and last name.
-
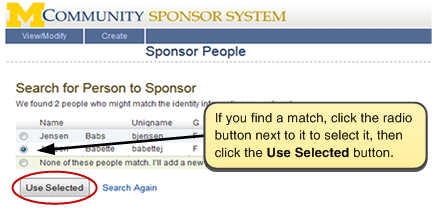
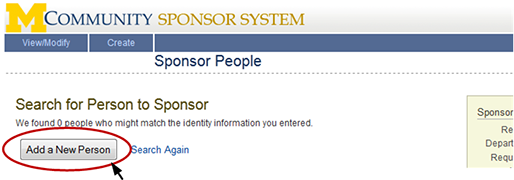
If the person you wish to sponsor is not in MCommunity, there will be no match to your search. Click Add a New Person to continue. If you get a number of matches, see Appendix A. Tips for Searching the System to Prevent Duplicates at the end of this document for tips on examining the available information to identify which, if any, entry matches the person you are sponsoring.
If the person you wish to sponsor has an MCommunity entry, you can add a sponsorship to it. Select the person to sponsor and click Use Selected. See Adding Sponsorships to an Already-Sponsored Person below for details.
-
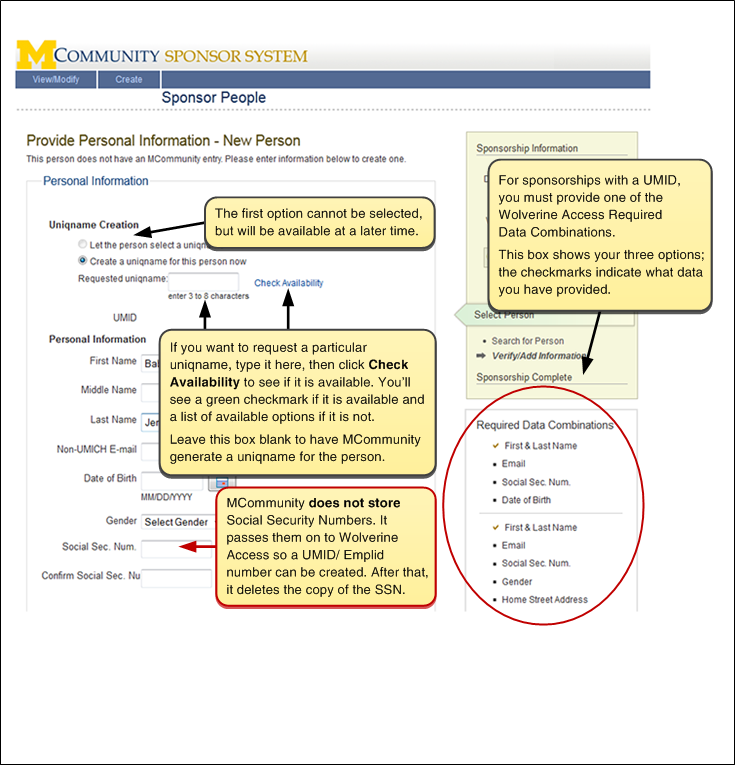
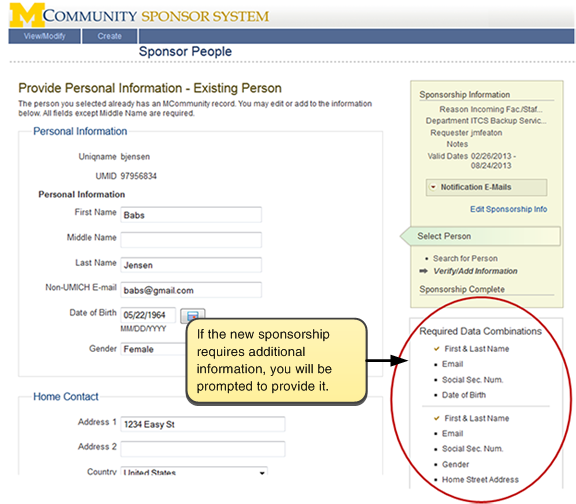
Next, enter the required information about the person you wish to sponsor. The amount of information required depends on the relationship the sponsored individual will have to the university.
Important Once a uniqname is generated, it is very difficult to change. By taking the time to request a uniqname, and reviewing uniqname options with the sponsored individual if the requested uniqname is not available, you can save a lot of time and trouble. Once a uniqname is generated, it may only be changed if it meets certain guidelines. See Changing Your Uniqname for more information.
For new sponsored people with a regular uniqname plus UMID, you must provide the minimum data required by Woverine Access because a Wolverine Access entry will be created for the person. The sponsored person will receive a regular uniqname and UMID.
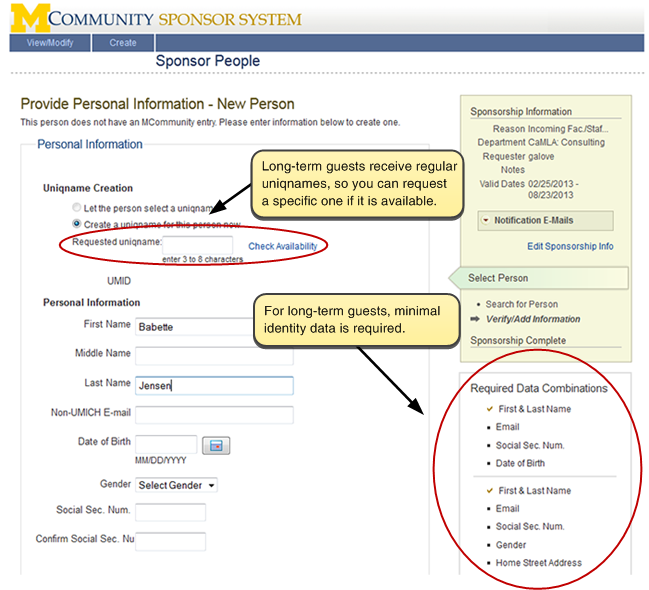
For long-term guests, only a name and a non-UMICH email address are required. The sponsored person will receive a regular uniqname, but will not get a Wolverine Access entry or a UMID. When sponsorships for long-term guests expire, the uniqnames cannot be reactivated because there is not enough identity information on file to do so.
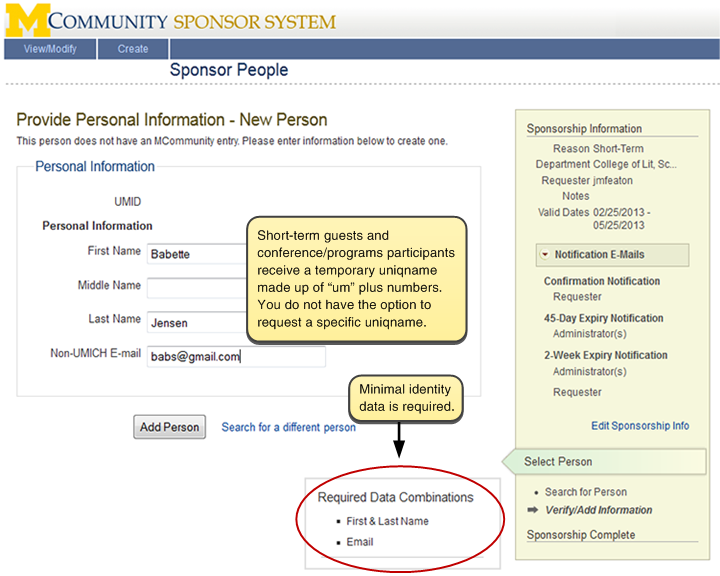
For guests who will get a temporary uniqname, only a name and a non-UMICH email address are required. The system generates a temporary uniqname for the sponsored person. It does not generate a Wolverine Access entry or a UMID.
-
Scroll down to the bottom of the window, and click the Add Person button.
-
You will see confirmation that the individual is now sponsored. It is important that you write down, or copy and paste, the password. This is the only opportunity you will have to do so.
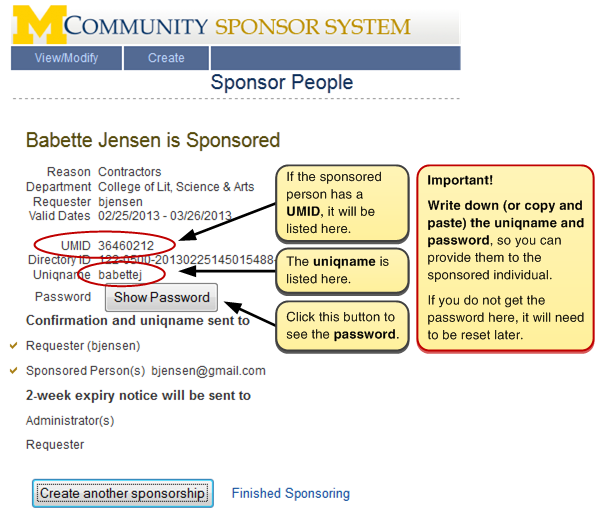
Depending what you selected for confirmation notifications, either, both, or none of these messages will be sent:
-
An email confirmation message to the requester providing the uniqname (but not the password). That message will instruct the requester to contact the ITS Service Center if computing services are needed for the newly sponsored individual. Either you or the requester can request computing services by filling out the Computing Services for Sponsored Persons Request Form, which is available on the MCommunity Forms page.
-
An email confirmation message with the new uniqname to the sponsored individual (sent to the non-UMICH address you provided).
It is your responsibility to convey the password to the sponsored individual in a secure manner.
-
-
Click Finished Sponsoring to return to the Sponsor System home page. Or, click Create another sponsorship if you want to sponsor another person with the same sponsorship information (that is, the same sponsoring department, business reason, and requester).

Adding Sponsorships to an Existing Identity
You cannot change the reason for a sponsorship, but you can add sponsorships for an individual. The option to add sponsorships allows for an individual having different sponsored relationships with different departments. It also allows for cases when an individual finishes one role with a department and moves into another one.
When you add a sponsorship to an existing identity, the individual maintains their existing uniqname and UMID.
Important If a person has a temporary uniqname, you cannot add sponsorships that result in a regular uniqname. You must instead create a new identity with a new regular uniqname. The identity with the temporary uniqname, and the temporary uniqname itself, can be allowed to expire.
Important Combining sponsorships with strong and weak identities is problematic; it can lead to creation of duplicate entries. If you need to add a sponsorship of one identity type to the entry of someone who has a different identity type, please contact the ITS Service Center for help.
-
Follow Steps 1-2 above to login and enter information about the sponsorship (sponsoring department, reason for the sponsorship, and so on), then search MCommunity for the person for whom you want to add a sponsorship.
If the person you are sponsoring already has a UMID, you can sponsor them by using that UMID. See Sponsor by UMID Walk-Through for details.
-
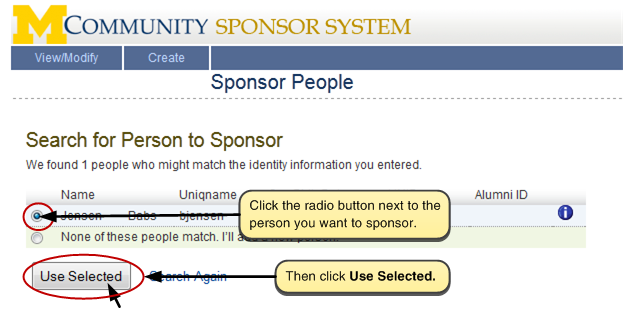
On the page showing your search results, click the radio button next to the entry for the person for whom you want to provide an additional sponsorship, then click the Use Selected button.
-
If you are prompted for additional information, provide it. In this example, the sponsorship being added (for an incoming staff member) requires more identity information than the sponsorship the person already has.
-
Scroll down to the bottom of the page and click Save Information.
-
You will see confirmation that the new sponsorship has been added. Depending on which notification options you selected, email confirmation notification may be sent to the requester, as well as to the sponsored person. A Wolverine Access entry is created only if one does not already exist.
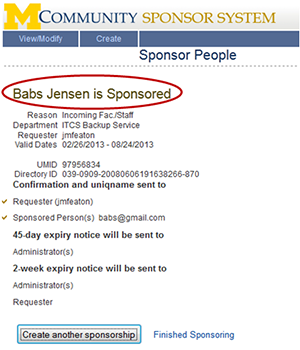
Important If you see a Show Password button on the confirmation page, it means the person's password has been reset. If you sponsor someone whose password is inactive (a terminated staff member, for example) the Sponsor System will reactivate their uniqname and set a new password for them. Be sure to pass the new password on to the sponsored person. If you do not, they will need to contact the ITS Service Center to get their password reset.
-
Click Finished Sponsoring to return to the Sponsor System home page. Or, click Create another sponsorship if you want to sponsor another person with the same sponsorship information (that is, the same sponsoring department, business reason, and requester).
If you would like to see how many sponsorships a sponsored individual has, you can search for and display that person's Sponsor System entry. See Editing Sponsorships below.
Sponsoring Multiple People by Importing a File
If you need to sponsor a group of people for the same reason- i.e., a number of people attending a conference- you can import the data about these people from a file.
Important The file import method can only be used for sponsorships that result in temporary uniqnames. This includes conference/program participants and other short-term guests.
For instructions, see MCommunity: Sponsoring Short-Term Guests Using File Import.
Creating a Report of Sponsorships
Follow these steps to view a list (or to create a report) of sponsorships:
-
Login to the Sponsor System. You will see a View and Modify Sponsorships screen.
-
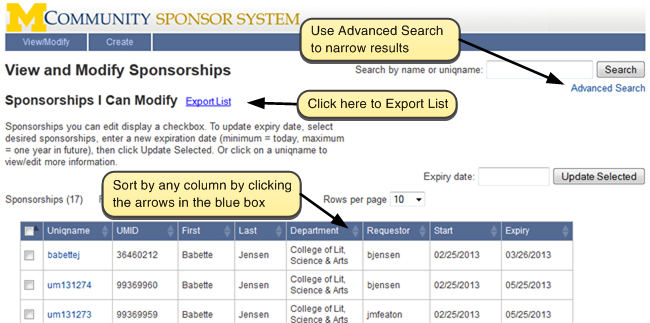
From this screen, you can sort the information by clicking the arrows next to any of the column descriptors. This is a convenient way to sort sponsorships by department, for example, if you are an administrator for multiple departments. You can increase the number of rows per page if it makes viewing the information more convenient.
-
To create a more specific list, use the Advanced Search function. This feature allows you to specify Department Group, Sponsorship Reason, and a range for sponsorship start date and/or end date. After specifying one or more criteria, click Search.
-
When the sponsorship information is sorted in a way that fits your purposes, click Export List to export the sponsorship information to an Excel spreadsheet.
Editing Sponsorships
Follow these steps to edit an existing sponsorship entry:
-
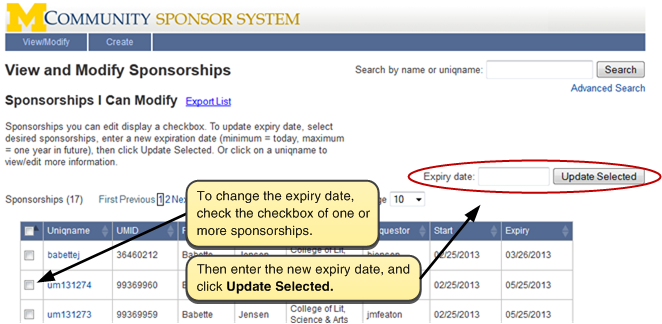
Login to the Sponsor System. You will see a View and Modify Sponsorships screen. From this screen, you can update the expiration date of one or more sponsorships and edit individual sponsorship entries.
-
To change the sponsorship expiration date, select the checkbox of one or more sponsorships.
Then enter the new expiration date and click Update Selected.
-
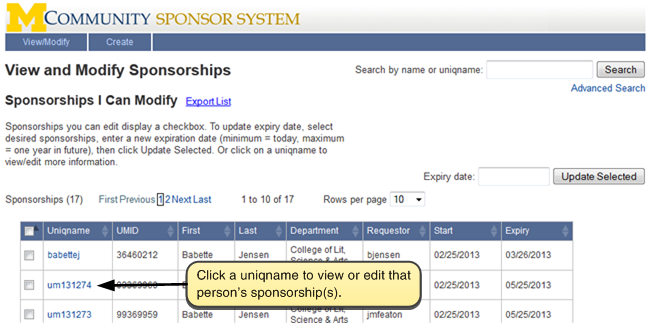
To select a sponsorship for editing, click on the uniqname.
-
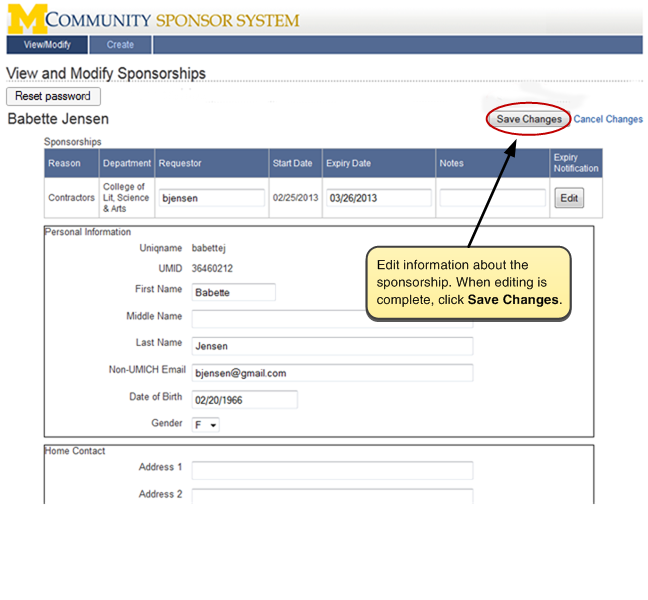
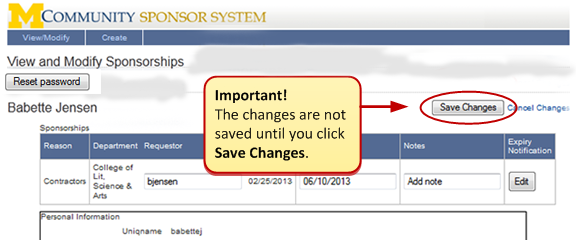
Make your changes, then click Save Changes.
-
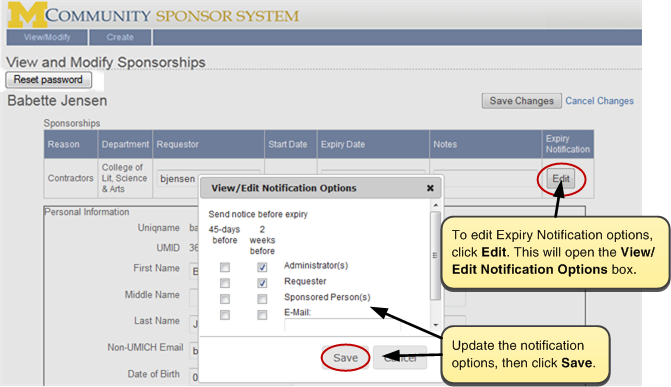
To edit Expiry Notification options, click Edit.
Update notification options, then click Save.
-
Important Click Save Changes when finished.
Resetting Passwords for Sponsored Individuals
See Communicating and Resetting Passwords for Sponsored People
Appendix A. Tips for Searching the System to Prevent Duplicates
Before you sponsor someone, you are prompted to do a search to see if this individual already has an entry in U-M systems. Your goal is to find any other entry, especially if the person already has a uniqname and/or UMID/Emplid. You can then add your sponsorship to this individual's entry.
You do this to prevent the creation of duplicate entries and the creation of multiple uniqnames for one person. Duplicate entries and multiple uniqnames create confusion, interfere with access to computing resources, and take many staff hours to correct. You can prevent these problems by conducting a thorough search to see if the person you want to sponsor is already in the system.
The Sponsor System's search tool searches data in MCommunity that comes from these data sources:
-
Wolverine Access for faculty, staff, retirees, and professors emeritus for all three campuses, as well as for Ann Arbor students. The Sponsor System interacts with the Wolverine Access SMBIO search-match tool.
-
MCommunity, which consolidates identity information from Wolverine Access as well as from
-
MCommunity Sponsor System for sponsored individuals
-
Dearborn Banner System for Dearborn students
-
Flint Banner System for Flint students
-
Donor Alumni Relationship Tool (DART) for alumni
-
When searching,
-
Find as many potential matches as you can
-
Examine the potential matches carefully
Tips: Find as Many Potential Matches as You Can
-
Try searching by the first few letters of the person's last name to help you catch possible mispellings of the name. If you get too many results, add more letters to your search.
-
Try searching by likely mispellings of the person's name (for example, Smith and Smyth, Lee and Li, Mitchell and Michell).
-
Try searching on common nicknames or variations of the first name (for example, Jim, James, Jimmy).
-
Ask if the person has a former name, such as a different last name because of marriage or divorce, and search for that former name. The person may already be listed in the system under that name, and you can then update the entry and add your sponsorship.
-
Try switching the first and last name if the person is from a country where family name or surname is traditionally listed first.
-
If you have information such as Social Security Number, birth date, and so on, use it in your search.
Tips: Examine the Potential Matches Carefully
-
Review the search results to see if the person you are sponsoring is already in the system.

-
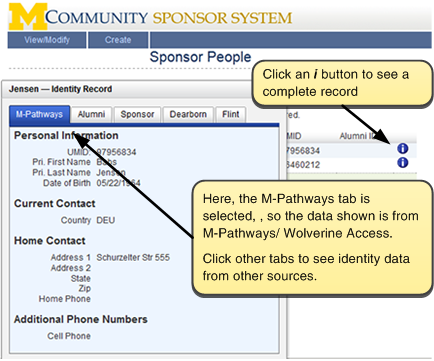
Use the info, or i, button to get more detail about a particular entry. Within the identity record, you can click different tabs to see data from different sources:
-
M-Pathways tab Shows data, if any, from Wolverine Access/M-Pathways.
-
Alumni tab Shows data, if any, from the Donor Alumni Relationship Tool (DART) database.
-
Sponsor tab Shows data, if any, from the MCommunity Sponsor System.
-
Dearborn tab Shows data, if any, from the Dearborn Banner System.
-
Flint tab Shows data, if any, from the Flint Banner System.
-
-
If you find a match, select it and use it. You will then add your sponsorship to the existing entry.