
Overview
Pages that you publish on the web are normally available to anyone. You can, however, restrict access to your web pages to the U-M community or to groups and/or individuals within it. Those who wish to view your pages must first log in with their uniqname and UMICH password. This document tells you how to publish web pages that only the U-M community — or specific groups and individuals in that community — can access.
Restricting Access to the U-M Community
Create a Private HTML Directory
-
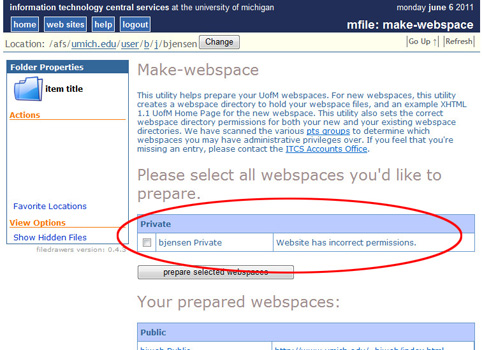
Open a web browser and navigate to https://mfile.umich.edu/make-webspace.
-
Authenticate using your uniqname and UMICH password.
-
Based on your membership in certain groups, you will see a list of available webspaces that can be restricted.
-
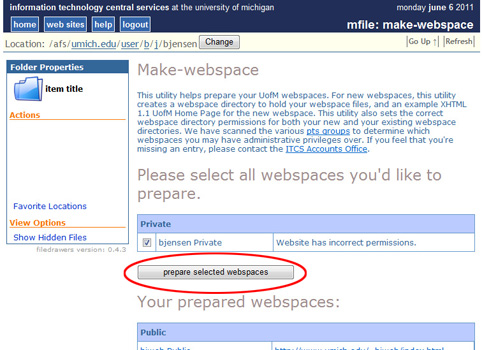
Click the checkbox next to the webspace you wish to make private, and then click prepare selected webspaces.
-
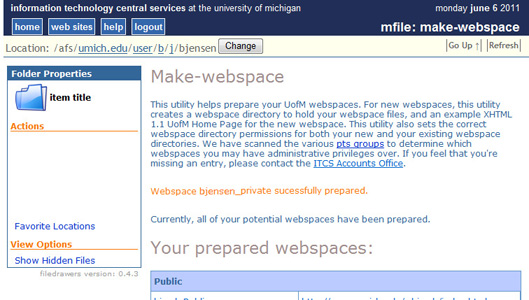
A private HTML directory (your private web space) — with all the necessary access privileges already set — will be created for you.
-
Log out of the Make Webspace page when finished.
Move Your Web Files in the Private Directory
To restrict access to your web pages to the U-M community, you will need to move the files for these pages into your private HTML directory (or folder). Inside your AFS home or group directory is a Private folder. Inside that is a folder called html. Move the files for the web pages into the html folder.
Tip If you already published the Web page(s) previously, you will need to remove the corresponding files from the html folder in your Public folder.
Use MFile for an easy-to-use, secure, web-based method of transferring files. You can also use WinSCP to access your AFS file storage space. You can obtain the following SFTP programs at no cost from the U-M Blue Disc:
Windows: Use WinSCP. For information about obtaining and using WinSCP, refer to: Use WinSCP to Transfer Files with sftp [Windows].
Mac OS X: We recommend that you use the Fugu program, which provides a graphical user interface to the secure file transfer capability of the Mac operating system.
Accessing the Restricted Pages
To access your restricted webpages, use a web browser to connect to the appropriate URL:
For your personal restricted-access web pages, use https://www-personal.umich.edu/~<uniqname>
where you have substituted your own uniqname for uniqname (do not type the angle brackets).
For your group restricted-access web pages, use https://www.umich.edu/~<groupname>
where you have substituted the name of your group for groupname (do not type the angle brackets).
Note HTTPS: The URLs begin with https instead of http. The s stands for a secure http connection and is required.
Anyone who navigates to the URL for your pages (including you) will receive a Login required screen. Log in with a uniqname and UMICH password to connect to the page.
Be sure to include a logout link on your page(s) so that people who have logged in can also log out. Here is HTML code for a sample link you can use:
<a href="https://www-personal.umich.edu/cgi-bin/logout">Logout</a>
Restricting Access to Specific Groups and Individuals at U-M
Follow the steps outlined previously to:
Create a private HTML directory (see instructions earlier in this document).
Move your web files into the private directory (see instructions earlier in this document).
You can then further restrict access to individuals or groups within the U-M community by using .htaccess files.
To work with .htaccess files, you should understand how to use a Unix text editor — such as pico or vi — to create and edit files. For instructions, refer to Using the Unix Text Editor Pico or Using the Unix Text Editor vi.
If you wish to restrict access to groups of people (rather than to individuals), you also need to know how to create and work with protection (pts) groups. For instructions, see Creating and Using Protection (pts) Groups for AFS .
To further restrict access to the web files in a particular directory, create a .htaccess file in that directory that specifies who can have access.
-
Connect to the ITS Login Service (login.itd.umich.edu).
-
Use the Unix text editor of your choice to create a file named .htaccess — note the leading period.
-
The file should contain two lines of text. Make the first line:
# Web space restriction description
- To grant access to individuals, begin the second line with Require user. Then add the uniqnames of the individuals who will be granted access to your webspace.
For example, if you wish to restrict access to a person whose uniqname is bjensen, create a .htaccess file with the following text:
# Web space restriction description
Require user bjensen -
To allow access to MCommunity Directory groups, begin the second line with Require ldap-group, followed by cn=<GROUP>,ou=User Groups,ou=Groups,dc=umich,dc=edu (where <GROUP>) is the group name.
For example, if you wish to restrict access to an MCommunity group called "My Web Group", create a .htaccess file with the following text:
# Web space restriction description
Require ldap-group cn=My Web Group,ou=User Groups,ou=Groups,dc=umich,dc=edu -
To grant access to U-M Friend accounts, begin the second line with Require user. Then specify the email address of the individuals who will be granted access to your webspace.
For example, if you wish to restrict access to an MCommunity group called "My Web Group", create a .htaccess file with the following text:
# Web space restriction description
Require user [email protected]To disable all friend accounts, type CosignRequireFactor UMICH.EDU:
# Web space restriction description
CosignRequireFactor UMICH.EDU
- To grant access to individuals, begin the second line with Require user. Then add the uniqnames of the individuals who will be granted access to your webspace.
-
Save the .htaccess file inside the directory containing the web files to which you want to restrict access.
For example, using Pico, hold down the Control key and press the letter O. When prompted for a file name, type Private/html/.htaccess then press Enter or Return. To exit Pico, hold down the Control key and press X.
Note Restrictions are enforced on a directory-by-directory basis, so you can make a subdirectory that is more narrowly restricted than Private/html.
Example:
You could restrict Private/html to members of the U-M community, restrict Private/html/assignment1 to the students and teaching assistants of a class, and restrict Private/html/assignment1/grades to only the teaching assistants. Note that restrictions can be narrowed in subdirectories, but you cannot have a subdirectory that is more widely available than its parent directory.
For a more complete overview of .htaccess files, refer to Setting up Access Control for Your HTML Documents.
For information on accessing the pages that you have restricted access to, see Accessing the Restricted Pages earlier in this document.