Installing VMware View Client
Mac
- Download the VMware View Client.
- Launch the VMware View Client and install the file.
Note Administrator access may be required.
- Click Agree.
- Copy the VMware View Client application file to the Applications folder.
Windows
- Download the VMware Horizon Windows Client.
- Launch the VMware-viewclient installation file.
Note Administrator access may be required.
- Click Next.
- Select I accept the terms in the license agreement and then click Next.
- Keep the default setting selections and click Next.
Note Click Browse to install the applicatin in a different location.
- Type midesktop.umich.edu in the Default View Connection Server field and then click Next.
- Adjust the default behavior, if neccessary, and then click Next.
- Select where to install shortcuts, if any, and then click Next.
- Click Install and then click Finish.
Note You may need to restart your computer before using VMware View Client.
Connecting to a Virtual Desktop
VMware View Client
Related To change your UMROOT password and match it with your UMICH password, see Choosing and Changing a Safe and Secure UMICH Password.
- Launch VMware View Client
- Double-click midesktop.umich.edu.
- Enter your uniqname and UMROOT (Windows Active Directory) password and then click Login.
Note If the Domain field is blank, select UMROOT from the drop-down list.
- Double-click a virtual desktop to connect.
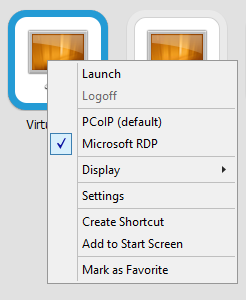
Note Current Mac clients no longer support the RDP protocol. To change the default protocol in the Windows client or for more advanced options, right-click the virtual desktop icon.

VMware Horizon HTML Access
- Go to the VMware Horizon launch page.
- Double-click VMware Horizon HTML Access.
- Log in with your uniqname and UMROOT (Windows Active Directory) password.
- Double-click a virtual desktop to connect.
Using a Virtual Desktop
Once connected, your virtual desktop behaves the same as a traditional computer.
Last Updated:
Tuesday, April 12, 2016 - 00:00

 to the Applications folder.