
Overview
At the University of Michigan, Emergency alerts are required as part of the Service Level Expectations (SLE) with ITS. Units using the Digital Signage service are required to keep level 1 alerts on the signs to properly keep students, staff, faculty and visitors informed of emergencies.
Emergency messaging in the ITS Digital Signage software is controlled by channels, which are configured with a template, a network location and an RSS feed. Emergency alerts on digital signs at the University of Michigan are controlled by DPS and are considered a “Level 1” alert. These types of emergencies are classified as any event that could threaten the safety or security of individuals on campus. Events like tornado warnings, gas leaks, fires, armed attacker and chemical spills are examples of this type of alert. When a level 1 alert is issued, the digital sign is completely taken over with information regarding the incident.
Before you begin, create a folder where you store the content for your Digital Sign(s). We recommend that you use this folder only for the DPS Alerts and name it accordingly. This folder will house the data files for the Emergency Alert feed. If you do not know the path to this UNC location, your Local IT staff should be able to provide it for you. This folder MUST be accessible by the sign player. You can either grant read access to the player system account (DSW-UNIT-###) or read access to the ‘Everyone’ account to this directory. Alternatively, a user name and password can be provided. Granting access to the auto-login account will not be sufficient. If you have difficulties with creating this folder with the appropriate access, contact the ITS Service Center.
Note You must create at least 1 template and 1 region before you can add content of any type to your player. See Creating a Template for Your Digital Sign (s4403)
Creating a Channel
The channel item in Content Manager holds the instructions for the player signs. It indicates what RSS feed to watch, what criteria within the feed to monitor, and what needs to happen if that criteria is met.
- Launch Content Manager and open your connection.
- Right-click on the Unit location and choose New Location... Name the Location whatever you'd like. Name is the only required field in the new Location properties.
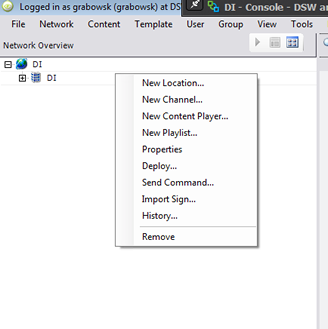
- Right-click on the new Location, and select New Channel...

- On the General tab, fill in the Channel Properties:
- Name the Channel. It is recommended that you name it something to the effect of "DPSS Alerts".
- Add a Description if desired.
- Under Display and Behavior:
- Select Shrink templates and content if needed to fit the screen
- Check Align templates smaller than screen
- Select Middle center
- Check Always on top checkbox
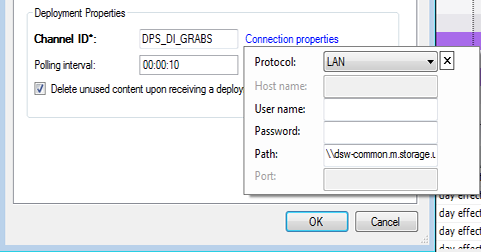
- Under Deployment Properties:
- Enter a Channel ID. This is how the channel will appear in the database, and should be named "DPSS_ UNIT" where UNIT is your Unit Prefix.
- Enter a Polling interval of 60 seconds. This is how often the signs check for updates to the emergency feed.
- Check the box to "Delete unused content upon receiving a deployment". This ensures the newest content is displayed.

- Click Connection Properties.
- Fill in the Connection Properties.
- Set the Protocol to LAN (Local Area Network).
- Set the path to the UNC path accessible to the player machine (where the content for your Digital Sign is stored) per the note from the top of this document.
- Close the Connection Properties box.
- On the Activation tab, fill in the new channel properties.
- Check the Wake up player when this channel is activated box and the Contains emergency or other high-priority content box for.
- Under Dynamic Activation:
- Check the Turn the channel box and, from the dropdown menu, select on.
- In the when the URL field, enter the following URL: http://www.dpss.umich.edu/rss/alert/
- Check the processed with XPath box and enter the following: /rss/channel/item/alertlevel
- Select contains and enter 1
- Click OK.

Note If you would like to test the Emergency Alert configuration on your player, use the DPSS test alert feed for the URL: http://dpss.umich.edu/rss/alert/test/
Configuring the Alert
The channel is like a playlist in that it only defines how the content is played or controlled. It doesn’t actually specify what is played when the event is triggered. DPS has established guidelines for emergency alerts based on the criteria of readability and accessibility.
Create a New Alert Template
- From the Content Manager toolbar, click Template > New.
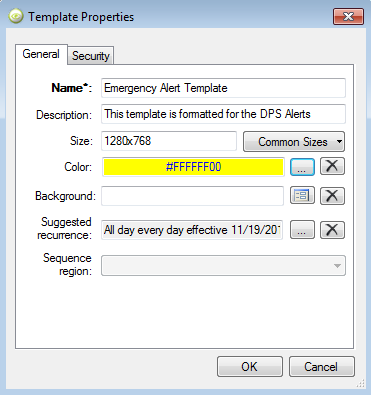
- In the Template Properties, enter a Name and Description (optional) for the template. It is recommended that you use something that will be easy to identify as being used for the Emergency Alerts only.
- Set the Size to be the same as your sign to ensure that the content of the alert will fit. Also, ensure that you choose a resolution that reflects the orientation of your sign.
- Set the Color of the sign to be bright yellow (HEX: #FFFFFF00; RGB: 255,255,0).
- Click OK.
Define the Alert Template Region
Create a region for the template. There will be only one region for the Emergency Alerts.
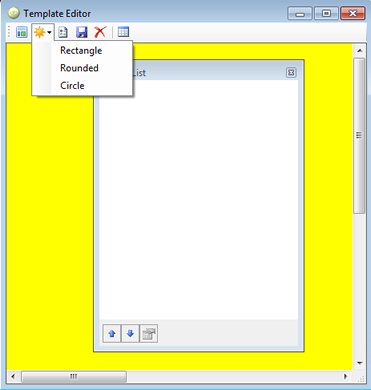
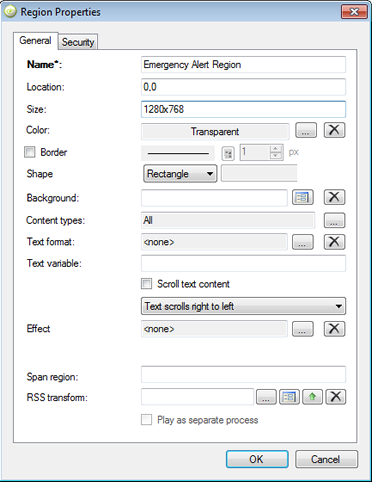
Set the Alert Template Region Properties
- Enter a Name for the region.
- Enter "0,0" in the Location (upper left corner)
- Set the Size to be the same as the resolution of your template so the region fills the entire space.
- Accept all other default settings and click OK.
- Save your template and close out of it.
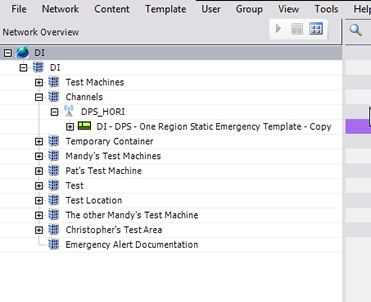
Add the Template to the Emergency Channel
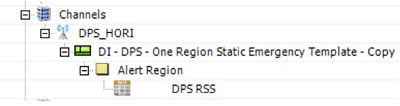
From the Templates view at the bottom of the Content Manager (if it's not displayed, click View from the Content Manager Toolbar, and check Templates), drag the template up to the channel you created above.
Set the Feed Properties
- From the Content view at the bottom of the Content Manager, right-click in your 'Category' and select New Content in this Category > Live Data.
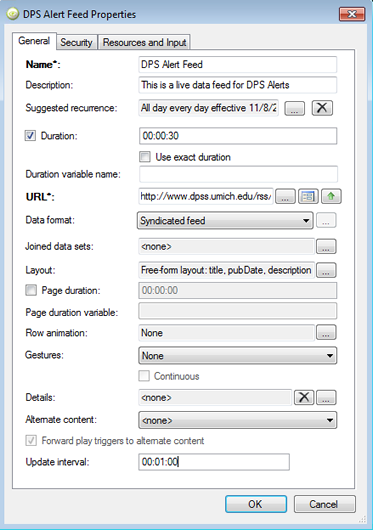
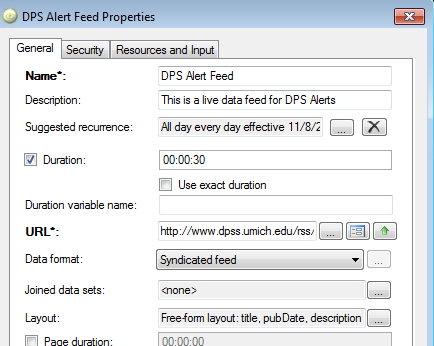
Note: If the content view is not displayed, click View from the Content Manager Toolbar, and check Content. - In the Live Data Properties, enter a Name and Description (optional). It is recommended that you use an easily recognizable name like, "DPSS Alert Feed".
- Check the Duration box and set this to something low (e.g., 30 seconds). It should be the only content displayed, so duration will only affect how quickly the screen reverts back once an emergency has ended.
- For initial layout, enter the URL: http://www.dpss.umich.edu/rss/alert/test/
- Click the elipsis button to the right of Layout.

Note The DPSS test feed must be used when designing the Live Data object. Layouts are built by selecting fields from the feed. Unfortunately, when no emergency is occuring, there are no fields to select from. Users will be unable to design the layout using the live DPSS feed for this reason.
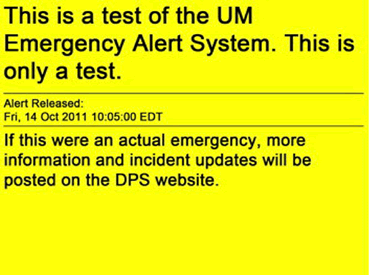
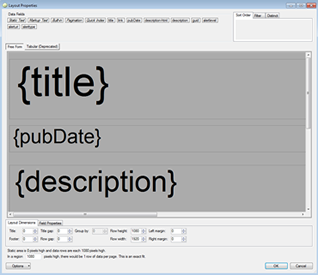
Define the Alert Layout
- The alert layout should resemble something like the yellow example test of the Emergency Alerts to the right. To create this layout, you will define three fields in the Layout Properties dialog (use auto-size font):
- Title: Font Arial, 100pt. Should be about 1/3 of the layout.
- Publication Date: Font Arial, 48pt. Should be about 1/3 of the top half of the layout.
- Description: Font Arial, 72pt. Should be the bottom half of the layout. (Auto-size Font should be on for all three) Click OK to exit the Layout Properties.
- Click OK to exit the Layout Properties.
Complete the Live Object Properties
- On the Live Data Object Properties, the Data Format should be Syndicated feed.
- The Update Interval should be 00:01:00.
- Click OK to return to the Content Player.
- Preview the Live Data object in the Content Player to ensure that your Emergency Alert looks like the screenshot above.
Update the URL
Once the layout is configured, right-click on the Live Data object, and change the URL to the non-test version of the DPSS feed: http://www.dpss.umich.edu/rss/alert/.
Move the Live Data Object to the Emergency Alert Template
Drag the new Live Data object into the region of your Emergency Alert template.
Deploying the Channel and Subscribing the Content Players
- Right-click the channel and select Deploy...
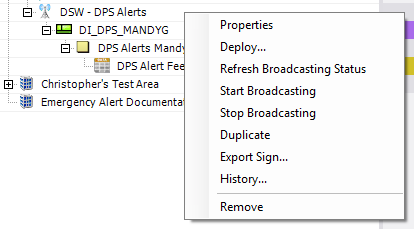
- Once deployed, you can click and drag the Channel icon to the player(s) that require it. This will add a Subscription to Channel indicator.
- Deploy the players once you've subscribed them to the Channel.
Note Each of your Content Players should contain a subscription to the Channel.