Create an Advertising Campaign
The first step is to create an advertising campaign for a group of content. Advertising is the true purpose of this tracking capability, but it will do what is needed for analytics as well.
- Select Advertising from the Tools menu in Content Manager.
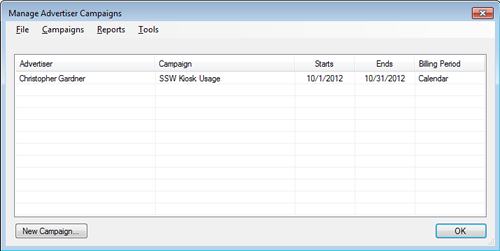
- In the Manage Advertiser Campaigns window, click New Campaign.

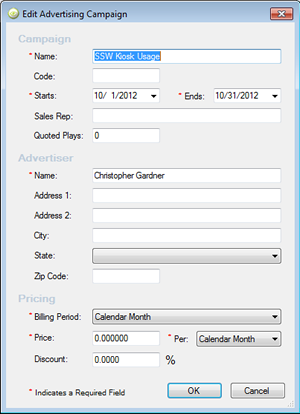
- In the window that appears, enter four key fields:
- (Campaign) Name – What you want your advertising campaign to be named?
- Starts – When would you like to track the usage of certain content?
- End – How long would you like to track usage on the sign?
- (Advertiser) Name – Who is monitoring this advertisement?

Subscribe Content to the Advertising Campaign
Once the campaign has been established, indicate which content should be tracked. This is done on the content objects themselves.
- On any piece of content you would like to track, right click and select Edit Source Content.
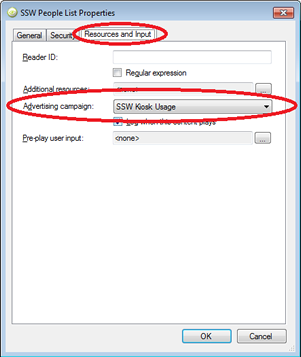
- Click the Resources and Input tab.
- Select the campaign that you want to track this piece of content with, from the Advertising Campaign drop-down list.

- click Ok. Add any additional pieces of content you wish to track.
- Deploy to the selected screens.
Collect the Data
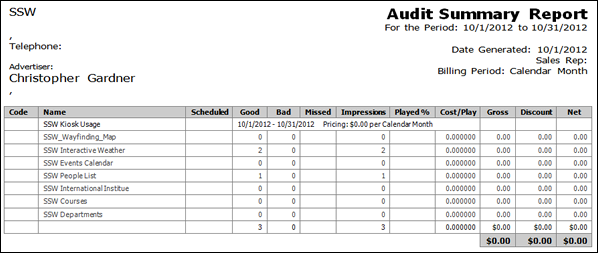
The advertising campaign feature of Content Manager keeps track of how many times a particular piece of content plays. It does so in 3 ways:
- Good – The content played in entirety.
- Bad – Something happened before the content played its entire duration.
- Missed – The content failed to play for some reason.
At any time during the duration of a campaign, you can pull a report of how your signs are being used. To do so, follow these steps:
- Go to Content Manager and choose Advertising from the Tools menu.
- In the Manager Advertiser Campaigns window select Audit Summary Report… from the Reports menu.
- Choose the appropriate date range that you wish to see information from, and then click Next.
- Choose the advertiser(s) you created for your campaign and then click Next.
- Choose the campaign(s) you created to track content plays on the signs and then click Next.
- Select the content you wish to show in the report, and then click Next.
- Choose which locations you wish to track in the report and then click Next.
- Select which signs specifically you wish to track from the chosen locations and then click Finish.
Note The report opens minimized in MS Word. You may need to click on the MS Word icon in the taskbar.
The report should be similar to the one below (which represents about an hour of time in the SSW campaign created above, despite the 10/1 -10/31 time frame). It should be noted that steps 4 and 5 above allow you to choose multiple campaigns and combine them in to one report, while steps 6 and 7 allow you to narrow down your report to specific signs and locations. If you don’t need to restrict or broaden your data, you can click Finish at any time.

